The Background Balancing tool allows images from school photoshoots to be post-processed to make the backgrounds all have the same color and brightness - all using our newest patent pending technology. Here’s how the tool works:
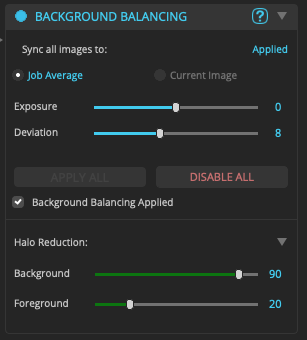
The top section controls settings for the entire job. First - choose what background to use as the target color. The target color is what all image backgrounds will be adjusted to match. “Job Average” means that all images backgrounds will be adjusted to the average background color for this job. “Current Image” will set all image backgrounds in the job to match the one currently selected image. The default is “Job Average” but you can switch this to Current Image if you want a specific color or brightness instead of the average that we calculate from the entire job.
You can also adjust the target color by making it slightly brighter or darker using the ‘Exposure’ slider. This will affect all images in the job.
The ‘Deviation’ slider allows you to control how close to the target each background will be corrected to. A value of zero means that all backgrounds will have exactly the same average brightness and color. A larger value, perhaps 8, will allow images that are very dark or very bright to be corrected slightly less that what would be required to make their backgrounds exactly match the target. Extreme background adjustments can look unnatural, so increasing this can help with the correction on these very bright or dark images.
You can then enable or disable the Background Balancing correction on all images with the Apply All and Disable All buttons. If you change any values in this top section, click Apply All again to apply the new values to the entire job.
Then, the lower section controls the Background Balancing correction that is applied to specific images. These values will only affect the one selected image.
Background and Foreground control the amount of correction applied to either the person (Foreground) or the backdrop or background in the image. Values of Background = 100 and Foreground = 0 means that the full correction is applied to the background, while zero correction is applied to the foreground. This provides the most accurate correction, but can result in visible “halos” surrounding the person in the photo on images with very different brightnesses between the foreground and background. If you see these “halos” - then increase the Foreground slider value, or decrease the Background slider to make the differences in the exposures less noticeable. Increasing Foreground applies a small exposure or color adjustment to the foreground area (the person) in order to decrease the difference in background and foreground. Setting Background to a value less than 100 means that the background for this image will be less than exactly the target color. This creates some deviation in the background for this image and the backgrounds in the images around it - that can be visible in a yearbook layout when the deviation becomes too large.
The 'Enable for current image' checkbox allows you to enable or disable the correction on individual images. This can be useful to preview how the Background Balancing will affect a single image, or to disable this feature on photos in the series that don't need balancing.
Enabling Background Balancing
Background Balancing is a pay-per-use feature. This tool will be disabled for all customers by default to ensure no unexpected costs are billed. If you would like to enable this temporarily to test its functionality, or if you are ready for full, paid use in production, then contact your B2B Enterprise support team or Sales Executive to enable this feature and setup the billing process.
You will only be charged for images that have this feature enabled when they are saved. You will NOT be charged if the feature is disabled entirely, if jobs are processed without this feature, or for individual images that were Unsynced when they were saved.
Enabling this feature on a job of photos requires additional processing time that can slow down opening and saving images by a small amount. For this reason, you should only enable this feature on jobs where you will be using it.
To enable Background Balancing, two things need to happen:
1.Your EyeQ sales or support contacts will need to enable this feature on your license of QuickDesk.
2.You need to enable this feature on the Session Configuration dialog when you open each job, as shown below. The Background Balancing controls in the right column will display a message indicating if the feature is disabled for your license or if you didn't enable this feature in the Session Configuration dialog.
![]()