Using QuickDesk with QuickServer QuickServer is installed automatically when you install QuickDesk – but it is an additional module to purchase. If you...
Read moreUsing Session Configuration in QuickDesk
QuickDesk is designed to work on one “job” at a time, opening all images in a folder at a time, so you can preview the corrections for the job, then save the corrected photos before moving on to the next job. When you start this, you will see the following Session Configuration dialog:
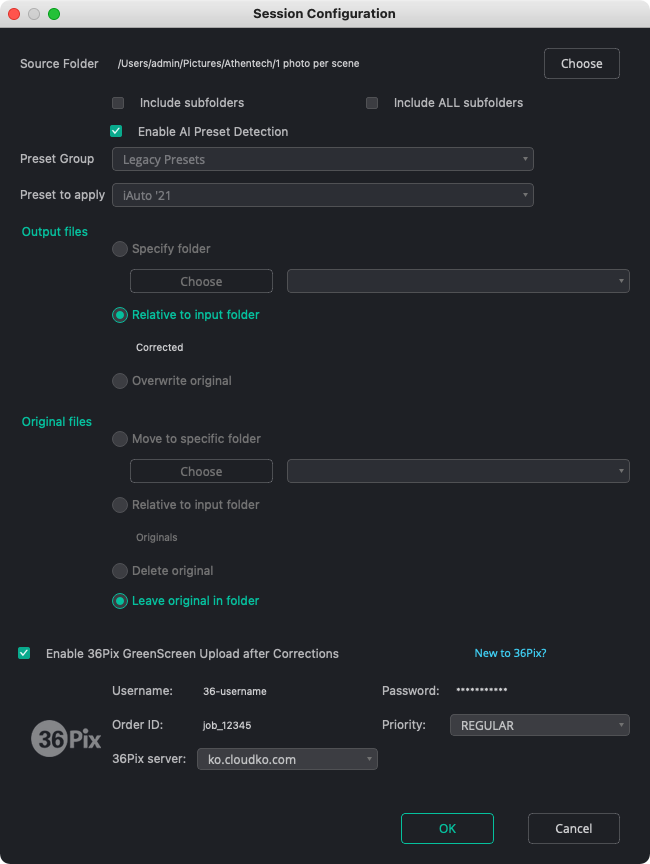
This allows you to define what Preset to start with and how the output and original images will be handled when each image is saved.
- Include subfolders: this will open the folder you select, and any folders found in that folder. All images in these folders will be added to the job, but any images in more deeply nested folders will not be included.
- Include ALL subfolders: this will open every image found in any folders below the folder you selected – at all folder depths.
Next – choose what presets to apply to the images when they are first opened. You can choose to use AI Preset Detection to choose the best preset for the content of each photo, or you can select a specific preset to apply to all photos in the job.
The next sections deal with file management – where to save the corrected photos, and what to do with the originals.
Output Files:
- Specify folder – choose one folder to save all images into
- Relative to input folder – this allows you to create a folder under the input folder by entering a relative path in the field below the checkbox. In the example above, a folder will be created in the input folder called “Corrected” and all images will be saved in that folder.
- Overwrite original – this will save the corrected photo to the same file as the original
Original Files:
- Move to specific folder – move all original images into a specific folder
- Relative to input folder – enter a relative path like “originals” and this will be created in the input folder, and the originals will be moved into this folder
- Delete originals – Selecting this option will result in ONLY the corrected images being kept after the job is processed
- Leave original in folder – don’t move or delete the originals; leave them where they are, unedited
36Pix Integration
We’ve worked together with the folks at 36Pix to build a handy integration between QuickDesk and their world-class Green Screen knockout process. Once you have a 36Pix account, just enter your account info along with the job information into the Session Configuration dialog. Then, each time to save an image, it will ALSO be uploaded to 36Pix to have the background knocked out. You’ll receive an email from them once the job is created, and another once the job is finished being processed. You can then download the transparent PNG’s using your normal FTP client. You can read more about this here: https://www.36pix.com/perfectly-clear.
Processing your Job
QuickDesk offers two main ways to work through your photos. These options are not mutually exclusive, so you can use them together – however there might be reasons to standardize on one method to make your workflow repeatable and predictable.
Page-by-Page
This is done by using the ‘Save/Next Page’ button in the top right once the current images are properly corrected. This will “close” the current images then will process the full output files. This method means that images are being saved out and moved through your workflow while you view and correct other images.
Save All
This is done by using the navigation arrows in the lower left, or the keyboard shortcuts (CTRL+arrow keys or CMD+arrow keys) to change images – while NOT processing them. This allows you to return to the images later in the job, but also means that all image processing is delayed until the full job is processed and the “Save All” button is clicked.
Edit Original in PhotoShop
Sometimes you’ll find a photo or two that need some specific retouching or editing in PhotoShop – so we’ve built that ability right into QuickDesk. Select the file you’d like to open in PhotoShop, then select Edit -> Edit Original in PhotoShop, or use the CTRL+E or CMD+E keyboard shortcut. This will launch PhotoShop and will open the selected file. Do any editing you need to in PhotoShop, and save the results, replacing the original file. QuickDesk will notice this change and will update the preview accordingly. Any settings you have applied in QuickDesk will now be applied to the newly edited file.
Note: You must save your PhotoShop edits over the original file; saving to PSD or different file type than the type that was originally loaded into QuickDesk will prevent QuickDesk from noticing the updates.
Note: Editing an original file in PhotoShop will overwrite the original. Any workflow options for the ‘Original’ file in QuickDesk will include these PhotoShop edits.