QuickDesk can be integrated into various LAB workflow tools like ROES using the ‘manifest file’ system described below. ROES Server can be configured...
Read moreThe Complete Guide to Using Perfectly Clear QuickServer for Version 4.7.0.2782 and Older
If you’re using QuickServer version 5.0.0 or later, please refer to this guide. The information below applies to version 4.9.9 and earlier.
How do I check my version number?
You can find the version number in the top left-hand corner of the QuickServer application window.
How do I update to the latest version?
1. Launch QuickServer.
2. Click the version number in the top left-hand corner.
3. Click the Update button.
Using QuickDesk with QuickServer
QuickServer is installed automatically when you install QuickDesk – but it is an additional module to purchase. If you run these two applications on the same computer, then all presets that you create in QuickDesk will automatically appear in QuickServer. If QuickDesk is run on a different computer, then you will need to manually copy your presets to QuickServer computer. These presets are stored in:
Mac: ~/Library/Application\ Support/Athentech/Perfectly\ Clear\ Shared/presets-v3
Windows: %appdata%\Athentech\Perfectly Clear Shared\presets-v3
Copy and paste these into Finder or Windows Explorer to quickly find these files.
QuickServer will monitor input folders that you define, and will process all images that are added to that folder, or it can correct images “in place” with the Target Channel capabilities.
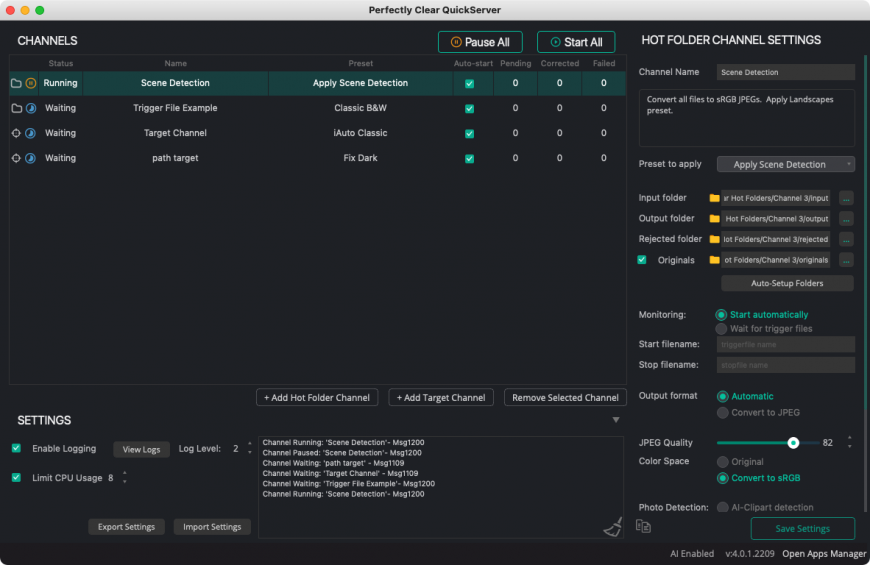
Channels are what the QuickServer uses to associate processing rules with the folders that it will watch, and with the Preset that will be applied to each image. Channels are listed in the main application window area, and show the following:
Status
•Running – this channel is setup and enabled. Any images added to the associated input folders will be processed immediately
•Paused – this channel is setup, but disabled. No processing will occur to images in these input folders
•Waiting – this channel is setup, and enabled, but it set to wait either for a trigger file to be created, or for a stop file to be deleted
•Invalid – this channel has an invalid setup – perhaps the Preset defined for this channel does not exist, or the folders for the channel do not exist and could not be automatically created.
Controlling Channel Status
You may start all valid channels at once with the ‘Start all’ button at the top, and likewise can pause all channels with ‘Pause All’. Or you can click the play or pause icon at the left of any channel row to toggle the state of that one channel.
Auto-Start
Check this to have this channel automatically start when the Hot Folder application starts up. If you have the Hot Folder application setup to run automatically when the computer boots or when you login to the computer, then this allows you to recover from reboots or other downtime events and automatically resume processing.
There are two types of Channels:
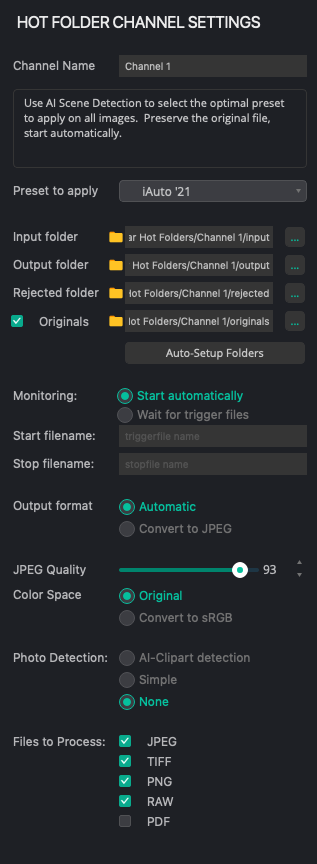
Hot Folder Channels
Hot Folder Channels are the most common type of channels and are most similar to what the Perfectly Clear LAB product supported. These have the following folders:
•Input – This is the folder that is monitored. Images added to this folder will be processed
•Output – Images will be placed here once the correction has been applied. This will include ‘skipped’ files that are not images (like .txt files)
•Originals – If you have chosen to preserve originals, then those will be copied here
•Rejected – Any image file that cannot be processed will be put in here. These are usually corrupt images, empty files with .jpg extension or other types of files that cannot be processed.
There is a “Auto-Setup Folders” button – click this, then choose one top-level folder for this channel, and it will create four sub-folders there automatically.
NOTE: If you need to ensure that all files added to the Input folder are kept together as part of a customer order, then you should set the Rejected folder to be the same as the Output folder. This will ensure that unsupported images (like CMYK-formatted TIF files, unsupported RAW files, corrupt JPEGs, etc) are also present in the Output folder. Otherwise, the image files that cannot be processed will be separated from the rest of the output files; they will moved to the Rejected folder.
All image processing is recursive. This means that you can add folders of images to the input folder, and this can be many folders deep. This same folder structure will be re-created in the output, originals, and rejected folders as well.
Valid Folder Settings
The following requirements must be met in order to have a valid channel definition:
- Input folders for all channels must be unique. No two channels can watch the same input channel.
- The input folder cannot be a under any of the output folders
- The output folders cannot be under the input folder
- One channel CAN set it’s input folder to the ‘Originals’ folder for another channel. Doing this would allow you to process the same images with more than one preset.
Monitoring
The channel can be set to begin processing automatically, or it can require a start file or stop file.
Start file – once this file is detected in the input folder, then processing will begin. This allows you to copy all image files into the input folder, then trigger the processing to begin once a specific file is created. This is typically an empty text file – but it can be any file or filetype. Enter the complete filename and extension in this field, for example trigger.txt
Stop file – once this file is NOT found in the input folder, then processing will begin. This allows you to create a file in the input folder, then add images. To begin processing, delete the stop file. If a stop file is defined, then this take priority over a start file. This means that if BOTH a start and stop file are defined, and both exist in the input folder, then processing will NOT happen.
Typical workflows will use either a start file, or a stop file, but not both.
Output Settings
Each channel can be set to convert images to JPEG, or to attempt to preserve the input format. For read-only formats like RAW files, these will always be converted to JPEG. Likewise, you can have the output images converted to sRGB, or you can have them remain in their original colorspace. We strongly recommend converting all images to sRGB before processing with Perfectly Clear to ensure the most predictable results.
Image Skipping & Clipart Detection
QuickServer will automatically detect “clipart” and other non-photographic images and will copy these un-edited into the output folders. This process can be controlled with the ‘Photo Detection’ options. “AI-Clipart detection” is the default and enables this process. “Simple” detection uses the same process that Perfectly Clear LAB used – it is less selective and corrects more images. “None” means that every valid image in the input folders will be processed.
Similarly, a channel can be set to skip processing of images based on file type. Simply uncheck the types you would like to skip. This is useful if you know that all PNG files are not photos, for example.
If you are using AI Scene Detection, then it is best to set this to ‘none’ – as Scene Detection includes a ‘Clipart’ Scene.
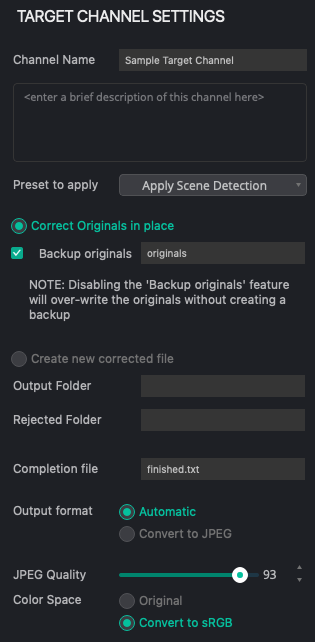
Target Channels
These channels do not have a specific input hot folder that is watched for images to process. Instead, you define certain channel settings within QuickServer application interface, then you target certain images or folders of images externally and use the command-line interface to begin processing. There are two modes of operation:
1. Correct Originals in place
In this mode, the original image file is replaced with the corrected version. This allows simple integration to most existing workflow solutions. There is an option to backup the original file while processing, and you can enter a relative path or absolute path for the folder to place these images in. In the example shown here, a new folder called “originals” will be created within the same folder that contains the original file, and the uncorrected image file will be backed up here.
2. Create new corrected file
This option will create a new file for the corrected image, leaving the original file untouched. You can also specify a folder for rejected files – any image file that cannot be processed will be put in here. These are usually corrupt images, empty files with .jpg extension or other types of files that cannot be processed.
NOTE: if you use an absolute path for the output or rejected paths, for example “C:\Photos\Corrected_images” then this can cause a case where two input files with the same filename, but in separate folders, will over-write one another as they are corrected. This is a very rare use-case, so please use caution when using absolute paths.
NOTE on –path usage when creating new output files:
There is an important difference between including or excluding a trailing path separator (either \ or / depending on Windows or Mac). Including the trailing path separator (for example –path “c:\images\input\“) will instruct QuickServer to process all images within the input folder. Any folders inside that folder will be processed, and will be re-created in the output folder. So, if the Output Folder was set to “..\output” and the –path was --path "C:\images\input\\" and this folder contained a jobs folder as shown below, then the the resulting output files would be:
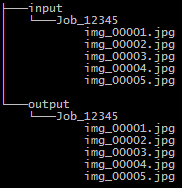
This identical output structure can be achieved also if the Output Folder is set to “..\..\output” and path is set to --path "C:\images\input\Job_12345" – but there is an important difference. In the first case, the entire contents of the input folder will be processed; in the second case, only the single Job_12345 is processed.
NOTE: on Windows from the CMD application window and in other uses, you may need to escape the trailing folder separator. Instead of just providing:
--path "C:\images\input\"
You might need to provide
--path "C:\images\input\\"
This is because Windows assumes the literal \” is an escape sequence for the double quote “
Please experiment with these various settings, and contact your EyeQ Account Executive if you have any questions.
Completion File
Both modes support an optional Completion File – this is an empty text file that is created when the last targeted image is processed. You can use this to trigger downstream processing of these images in other workflow tools. When using manifest files, the completion file path and name will be determined by the value in the manifest file. When the “–path” method is used, then the file specified in the Target Channel Settings will be used.
Output Settings, Image Skipping, Clipart Detection
These sections are identical in usage to Hot Folders, explained above.
Starting a Target Channel
Once a Target Channel is setup, you will call QuickServer from an external application or command line in order to target which images to correct. There are two methods to do this:
1. Target a folder of images
To process every image in a particular folder, you can use the channel and path command-line arguments:
Windows:
Perfectly Clear QuickServer.exe --cli --channel "Example Target Channel" --path "D:\images\jobs\Job_12345"
Mac:
"/Applications/Athentech/Perfectly Clear QuickServer.app/Contents/MacOS/Perfectly Clear QuickServer" --cli --channel "Example Target Channel" --path "/Users/admin/images/jobs/Job_12345"
Both of these should be on a single line. This will begin processing every image found in the folder that is targeted with the command above.
2. Target using a Manifest File
If you need to process images from different folders, or need to correct only SOME of the images in a given folder, then you can use the manifest file command-line argument:
Windows:
Perfectly Clear QuickServer.exe --cli --manifest "D:\images\jobs\Job_12345\manifest.txt"
Mac:
"/Applications/Athentech/Perfectly Clear QuickServer.app/Contents/MacOS/Perfectly Clear QuickServer" --cli --manifest "/Users/admin/images/jobs/Job_12345/manifest.txt"
Both of these should be on a single line.
Manifest File Options
The section below shows all data that can be included in the manifest files and all options for these fields. Values in “quotes” will be literal strings included in the file.
| manifest_format_version: | 2 |
| channel_name: | Literal name of the channel to process with |
| job_complete_triggerfile: | Path and filename for the optional job complete trigger file. If this is present in the manifest file, then this takes precedence over the value set in the Target Channel Settings for this channel. |
| job_images: | One or more of the following: •Absolute path to single folder to process •Absolute paths to individual images to process |
| manifest_duplicate_time_limit: | Prevent loading a second job from the same manifest path for the specified number of seconds. This can prevent processing the same job more than once. |
Sample Manifest file contents:
Here is an example of a manifest file, showing proper formatting and setting all available options. Note this is very similar to the QuickDesk Manifest file format (which is version 1) used to automate the Perfectly Clear corrections of many images when attendance and monitoring is required:
manifest_format_version: 2
channel_name: Example Target Channel
manifest_duplicate_time_limit: 10
job_complete_triggerfile: /Users/admin/Pictures/Athentech/Job_12345/done_1.txt
job_images:
/Users/admin/images/jobs/Job_12345/img_0001.jpg
/Users/admin/images/jobs/Job_12345/img_0005.jpg
/Users/admin/images/jobs/Job_12345/img_0010.jpg
:end_of_job
Command Line Reference
Below is a complete list of the command line arguments available:
| –cli | Required for all command-line options. All other arguments will be ignored if this argument is not present. |
| –channel | Sets which channel to target the image files to. Inclose in double-quotes:--channel "My Channel Name" |
| –path | Sets the path that contains the images to process. Inclose in double-quotes:--path "d:\image_store\clients\client_1234\job_5678" |
| –manifest | Set the full path and filename of the manifest file to process. Inclose in double-quotes if the paths contains spaces, special characters, etc:--manifest "d:\image_store\jobs\job_123435.txt" |
| –force | Start QuickServer if it is not already running. Without this argument, the HFP application will not start if it is not already running, and will return the ‘No Primary Instance’ error code. |
| –log | Enables verbose logging of this process in a file called QuickServer-cli.log in the same folder as the main QuickServer.log file (click View Logs in the Settings area to open this folder). |
Return codes:
| 0 | Success. Specific text is also printed to standard output to explain the action taken. |
| 1 | Unused arguments detected. Arguments were provided on the command line that were not understood. |
| 2 | More Arguments Needed. Some required arguments are needed that were not supplied. |
| 3 | Invalid Manifest. |
| 4 | No Primary Instance. QuickServer was not already running, and –force was not also requested. |