QuickDesk and QuickServer are two parts of the same overall product. You can purchase only QuickDesk, or you can purchase QuickDesk and QuickServer....
Read moreHow to Use Target Channels in QuickServer
If you’re using QuickServer version 5.0.0 or later, please refer to this guide. The information below applies to version 4.9.9 and earlier.
How do I check my version number?
You can find the version number in the top left-hand corner of the QuickServer application window.
How do I update to the latest version?
1. Launch QuickServer.
2. Click the version number in the top left-hand corner.
3. Click the Update button.
Target channels in Perfectly Clear QuickServer allow you to automatically correct images without using the ‘Hot Folder’ approach. This method allows you to correct any image or sets of images that are accessible to your QuickServer computer – either local files or files on a network drive – without having to move images in and out of a hot folder.
You can define Target channel settings in QuickServer, then use the Perfectly Clear CommandLine interface to begin processing.
Target Channel Settings
Channel Name
A unique name for your channel. This will help you identify it easily.
Correct Originals in place
In this mode, the original image file is replaced with the corrected version. This allows simple integration to most existing workflow solutions. There is an option to backup the original file while processing, and you can enter a relative path or absolute path for the folder to place these images in. In the example shown here, a new folder called “originals” will be created within the same folder that contains the original file, and the uncorrected image file will be backed up here.
Create new corrected file
This option will create a new file for the corrected image, leaving the original file untouched. You can also specify a folder for rejected files – any image file that cannot be processed will be put in here. These are usually corrupt images, empty files with .jpg extension or other types of files that cannot be processed.
NOTE: if you use an absolute path for the output or rejected paths, for example “C:\Photos\Corrected_images” then this can cause a case where two input files with the same filename, but in separate folders, will over-write one another as they are corrected. This is a very rare use-case, so please use caution when using absolute paths.
NOTE on –path usage when creating new output files:
There is an important difference between including or excluding a trailing path separator (either \ or / depending on Windows or Mac). Including the trailing path separator (for example –path “c:\images\input\“) will instruct QuickServer to process all images within the input folder. Any folders inside that folder will be processed, and will be re-created in the output folder. So, if the Output Folder was set to “..\output” and the –path was --path "C:\images\input\\" and this folder contained a jobs folder as shown below, then the the resulting output files would be:
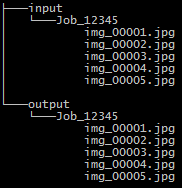
This identical output structure can be achieved also if the Output Folder is set to “..\..\output” and path is set to --path "C:\images\input\Job_12345" – but there is an important difference. In the first case, the entire contents of the input folder will be processed; in the second case, only the single Job_12345 is processed.
NOTE: on Windows from the CMD application window and in other uses, you may need to escape the trailing folder separator. Instead of just providing:
–path “C:\images\input\”
You might need to provide
–path “C:\images\input\\”
This is because Windows assumes the literal \” is an escape sequence for the double quote “
Please experiment with these various settings, and contact your EyeQ Account Executive if you have any questions.
Completion File
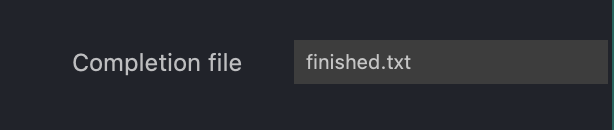
Both modes (‘Correct Originals in place’ and ‘Create new corrected file’) support an optional Completion File — this is an empty text file that is created when the last targeted image is processed. You can use this to trigger downstream processing of these images in other workflow tools. When using manifest files, the completion file path and name will be determined by the value in the manifest file. When the “-path” method is used, then the file specified in the Target Channel Settings will be used.
Output Format
Each channel can be set to convert images to JPEG, or to attempt to preserve the input format. For read-only formats like RAW files, these will always be converted to JPEG.
JPEG Quality
The JPEG compression level in QuickServer is configurable by the user. For reference, our JPEG compression level in QuickDesk is 93%.
Color space
You can have the output images converted to sRGB, or you can have them remain in their original colorspace.
Files to process
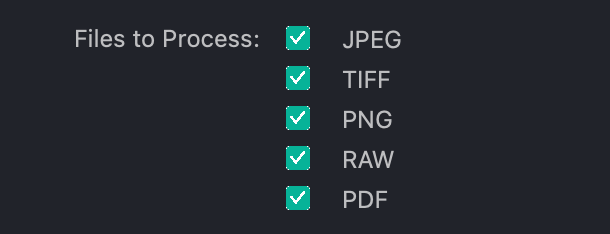
- Cloud tools work with JPG and PNG file formats only.
Other file formats will be processed with all other corrections but ignored by Cloud tools.
- Starting in Version 4.4, RAW file support is now provided separately on Mac and Windows machines.
On Windows, the following extensions to provide RAW support. Please click each link below and install these components to have the broadest access to RAW file support.
Resize Output
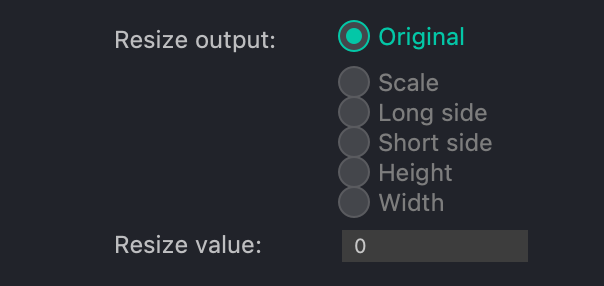
The resizing feature allows you to decrease the dimensions of your images according to your specific requirements. It gives you flexibility in resizing your images while maintaining or altering the aspect ratio based on your preferences.
Original: The image will not be reduced. This is a default value.
Scale: You can enter a value from 1% to 100%.
Make sure that QuickServer will not output the image less than 32px. For example: if the original image was 40px*40px and after resizing became 10px*10px, the image will not be output.
You can set a specified dimension to long or short side, to height or width. Available values from 32px to 10 000px. Other side will be adjusted proportionally to maintain the aspect ratio.
Tools
Learn more about each of the different tools in this section here:
Logs
Logs shows general QuickServer logs. Logging level controls how informative logs should be.
1.Target a folder of images
To process every image in a particular folder, you can use the channel and path command-line arguments:
Windows:
Perfectly Clear QuickServer.exe --cli --channel "Example Target Channel" --path "D:\images\jobs\Job_12345"
Mac:
"/Applications/Athentech/Perfectly Clear QuickServer.app/Contents/MacOS/Perfectly Clear QuickServer" --cli --channel "Example Target Channel" --path "/Users/admin/images/jobs/Job_12345"
Both of these should be on a single line. This will begin processing every image found in the folder that is targeted with the command above.
2. Target using a Manifest File
The complete command will look like this:
Windows:
Perfectly Clear QuickServer.exe --cli --manifest \\file-server\image-store\job-00012345.txt
Mac:
/Applications/Athentech/Perfectly Clear QuickServer.app/Contents/MacOS/Perfectly Clear QuickServer" --cli --manifest "/Users/admin/images/jobs/Job_12345/manifest.txt
Both of these should be on a single line.
Manifest File Options
The section below shows all data that can be included in the manifest files and all options for these fields. Values in “quotes” will be literal strings included in the file.
| manifest_format_version: | 2 |
| channel_name: | Literal name of the channel to process with |
| job_complete_triggerfile: | Path and filename for the optional job complete trigger file. If this is present in the manifest file, then this takes precedence over the value set in the Target Channel Settings for this channel. |
| job_images: | One or more of the following: •Absolute path to single folder to process •Absolute paths to individual images to process |
| manifest_duplicate_time_limit: | Prevent loading a second job from the same manifest path for the specified number of seconds. This can prevent processing the same job more than once. |
Sample Manifest file contents:
Here is an example of a manifest file, showing proper formatting and setting all available options. N
The manifest file would contain this:
manifest_format_version: 2
channel_name: Target Channel
job_complete_triggerfile: \\file-server\image-store\job-00012345\done.txt

job_images:
\\file-server\image-store\job-00012345\images\IMG_0001.jpg
\\file-server\image-store\job-00012345\images\IMG_0002.jpg
\\file-server\image-store\job-00012345\images\IMG_0003.jpg
\\file-server\image-store\job-00012345\images\IMG_0004.jpg
\\file-server\image-store\job-00012345\images\IMG_0005.jpg
\\file-server\image-store\job-00012345\images\IMG_0006.jpg
:end_of_job
This lists every file to correct and which channel to use. The channel defines where to put the output and original files, and what settings to apply. Once the job is complete, you’ll have these corrected images:
\\file-server\image-store\job-00012345\images\IMG_0001.jpg
\\file-server\image-store\job-00012345\images\IMG_0002.jpg
\\file-server\image-store\job-00012345\images\IMG_0003.jpg
\\file-server\image-store\job-00012345\images\IMG_0004.jpg
\\file-server\image-store\job-00012345\images\IMG_0005.jpg
\\file-server\image-store\job-00012345\images\IMG_0006.jpg
and the originals will be here:
\\file-server\image-store\job-00012345\images\originals\IMG_0001.jpg
\\file-server\image-store\job-00012345\images\originals\IMG_0002.jpg
\\file-server\image-store\job-00012345\images\originals\IMG_0003.jpg
\\file-server\image-store\job-00012345\images\originals\IMG_0004.jpg
\\file-server\image-store\job-00012345\images\originals\IMG_0005.jpg
\\file-server\image-store\job-00012345\images\originals\IMG_0006.jpg
The last step is that QuickServer will (optionally) write a “completion file” to inform you that the job is finished. This is specified in the manifest file:
\\file-server\image-store\job-00012345\done.txt
You can setup other systems to monitor for this file, knowing that every image in that job was corrected before that file was written.
Command Line Reference
Below is a complete list of the command line arguments available:
| –cli | Required for all command-line options. All other arguments will be ignored if this argument is not present. |
| –channel | Sets which channel to target the image files to. Inclose in double-quotes:--channel "My Channel Name" |
| –path | Sets the path that contains the images to process. Inclose in double-quotes:--path "d:\image_store\clients\client_1234\job_5678" |
| –manifest | Set the full path and filename of the manifest file to process. Inclose in double-quotes if the paths contains spaces, special characters, etc:--manifest "d:\image_store\jobs\job_123435.txt" |
| –force | Start QuickServer if it is not already running. Without this argument, the HFP application will not start if it is not already running, and will return the ‘No Primary Instance’ error code. |
| –log | Enables verbose logging of this process in a file called QuickServer-cli.log in the same folder as the main QuickServer.log file (click View Logs in the Settings area to open this folder). |
Return codes:
| 0 | Success. Specific text is also printed to standard output to explain the action taken. |
| 1 | Unused arguments detected. Arguments were provided on the command line that were not understood. |
| 2 | More Arguments Needed. Some required arguments are needed that were not supplied. |
| 3 | Invalid Manifest. |
| 4 | No Primary Instance. QuickServer was not already running, and –force was not also requested. |
So, what does this feature really provide?
Quite a bit, really! This allows integration with a huge range of systems and lab management tools. It means that you don’t need to move image files around in order to use our auto-correction capabilities.