We’ve introduced a powerful new feature in QuickServer — integration with Perfectly Clear Cloud. This allows you to enhance your images with Cloud AI Tools...
Read moreQuickServer V5 User Guide
Perfectly Clear QuickServer is our fully automated Hot Folder application designed to run on your backend server. Available for both Mac and Windows, QuickServer is easy to set up—especially with the help of the guide below. Once configured, it runs automatically, processing and correcting thousands of photos per hour with no further input required. QuickServer includes a comprehensive suite of photo editing tools, supports the most common file types, and integrates seamlessly with many major workflows. Continue reading to learn how to get started.
- Installing QuickServer
- New QuickServer Interface
- Getting Started
- Channel Settings
- QuickServer Settings
- Main Window
New QuickServer Interface
QuickServer V5 has a new and improved interface, though the functionality remains the same.
Updates include:
- Streamlined Settings: Settings are now organized into five logical groups: General Settings, Folder Paths, Tools, Input Settings, and Output Settings.
- Improved Channel Creation: A step-by-step wizard guides you through these five groups of settings, making channel creation easier than ever.
- Helpful Explanations: All settings now include explanatory information to clarify their purpose and usage.
- Tool Visibility: You can now see which tools are used for each channel directly in the channel list.
- New QuickServer Menu: We added a QuickServer menu and moved general settings there for easier access.
- Refined Logging: Logs are now split – each channel displays only its own relevant information along with general QuickServer details. For a complete view of all channels plus system logs, visit the QuickServer menu.
Installing QuickServer
QuickServer is easy to setup and install. Run the automated installer — if you’re reading this guide, you’ve likely received a link to download and install QuickServer. Click this link and follow the installation instructions, then open QuickServer. If you do not have a link, please contact your Perfectly Clear account representative or request one here.
Activate license key. A license key is required to use QuickServer beyond the free trial period. If you have not already received a license key, contact your Perfectly Clear account representative or get in touch with us here.
Once you have your license key ready, launch QuickServer and click the version number in the upper lefthand corner to open the Manage App screen. In the License Information section, enter your email address and license key. Then click “Active License”.
Using Workbench with QuickServer. You can use Workbench, a separate desktop application, to create custom presets, see a preview of images, and make manual adjustments to color correction. If you run these two applications on the same computer, then all presets that you create in Workbench will automatically appear in QuickServer. If Workbench is run on a different computer, then you will need to manually copy your presets to QuickServer computer. These presets are stored in:
- Mac:
~/Library/Application\ Support/Athentech/Perfectly\ Clear\ Shared/presets-v3 - Windows:
%appdata%\Athentech\Perfectly Clear Shared\presets-v3
Copy and paste these into Finder or Windows Explorer to quickly find these files.
Getting Started
QuickServer works through channels – channels associate editing tools with particular folders (or images) and settings.
To get started, you’ll first select which type of channel you’d like to setup. There are two types of channels: Hot Folder Channels and Target Channels.
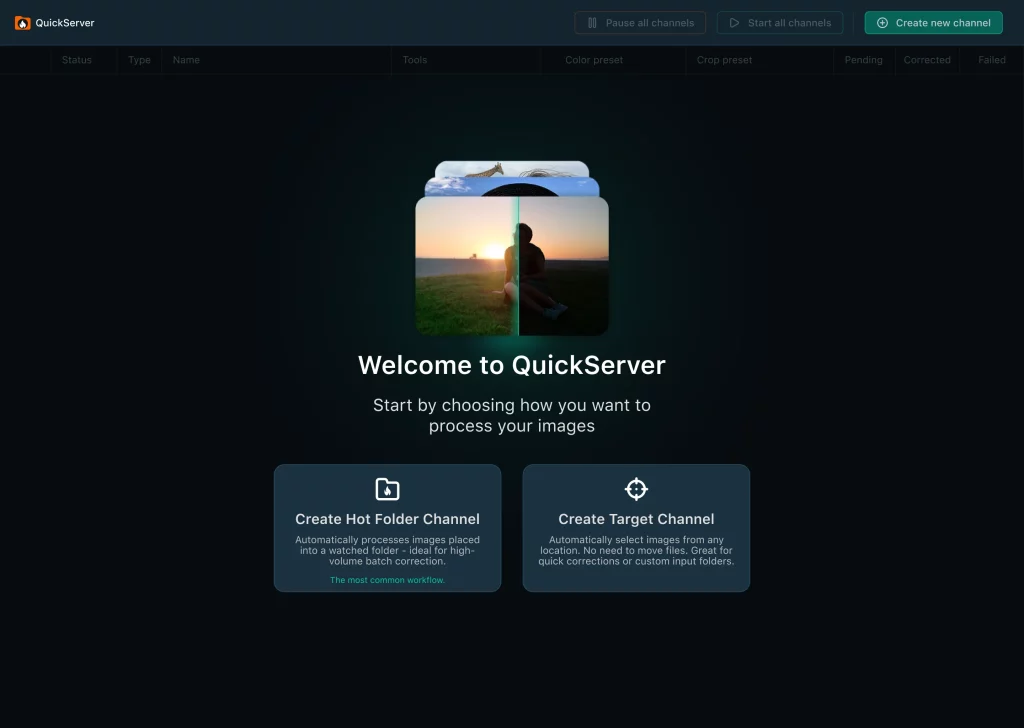
Hot Folder Channels
Hot Folder Channels are most common and work by monitoring input folders that you define and processing all images that are added to that folder.
Target Channels
Target Channels allow you to automatically correct images without using the ‘Hot Folder’ approach. They can be helpful if you don’t want files moving around. Instead of watching a specific folder and correcting the images there, target channels can find any image or set of images that are accessible to your QuickServer computer – either local files or files on a network drive – and correct them in place. You can define Target Channel settings in QuickServer, then use the Perfectly Clear CommandLine interface to begin processing.
Channel Settings
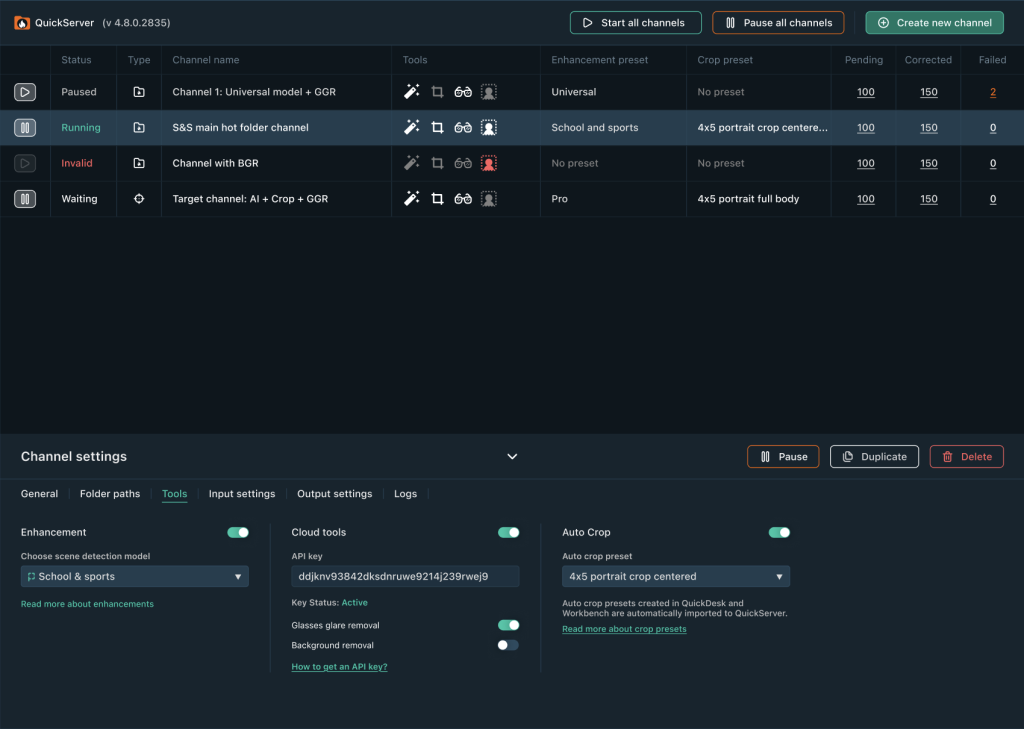
Once set up, channels are listed in the main application window area in QuickServer. Each channel has it’s own settings, which can be accessed by selecting a channel in the main channel list. Channel settings for the selected channel will then appear in the bottom panel.
1. General Settings
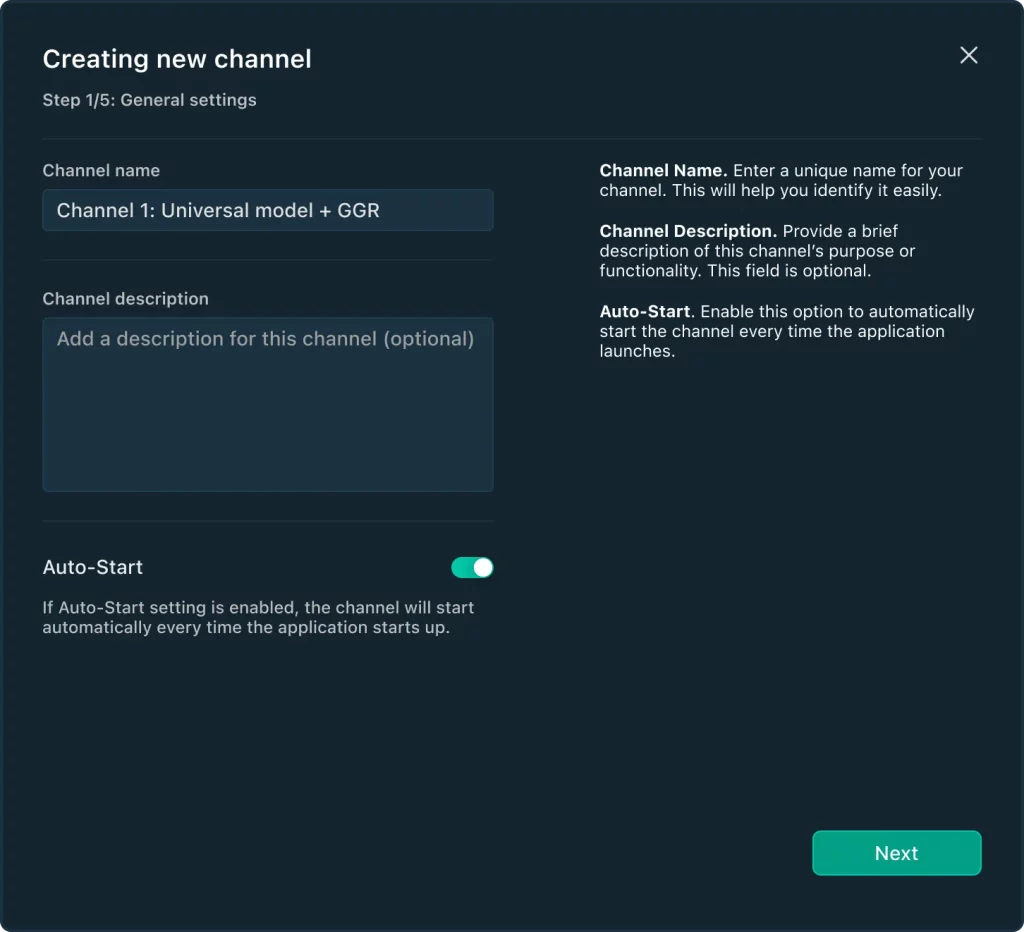
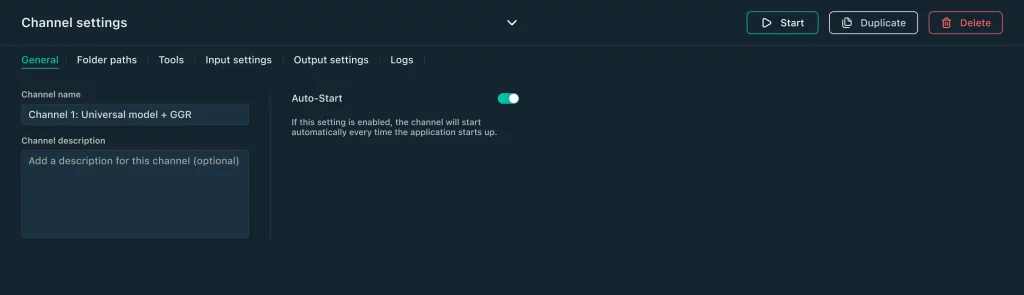
Channel Name
A unique name for your channel. This will help you identify it easily.
Auto start
Select “Auto start” to have this channel automatically start when the Hot Folder application starts up. If the Hot Folder application is set to run automatically when the computer boots or when you login, Auto start allows you to recover from reboots or other downtime events and automatically resume processing.
2. Folders Paths
Folders Paths for Hot Folder Channels
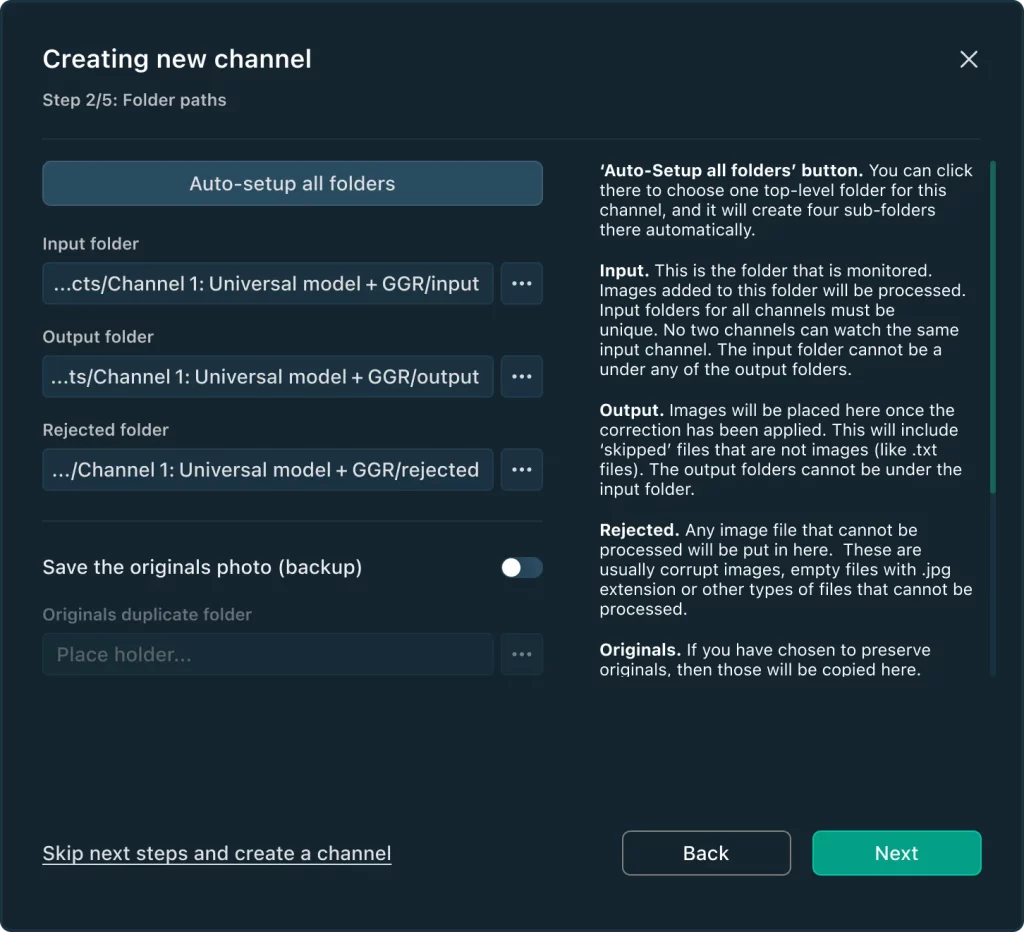

- Input – This is the folder that is monitored. Images added to this folder will be processed
- Output – Images will be placed here once the correction has been applied. This will include ‘skipped’ files that are not images (like .txt files)
- Rejected – Any image file that cannot be processed will be put in here. These are usually corrupt images, empty files with .jpg extension or other types of files that cannot be processed.
- Originals – If you have chosen to preserve originals, then those will be copied here
NOTE: If you need to ensure that all files added to the Input folder are kept together as part of a customer order, then you should set the Rejected folder to be the same as the Output folder. This will ensure that unsupported images (like CMYK-formatted TIF files, unsupported RAW files, corrupt JPEGs, etc) are also present in the Output folder. Otherwise, the image files that cannot be processed will be separated from the rest of the output files; they will moved to the Rejected folder.
All image processing is recursive. This means that you can add folders of images to the input folder, and this can be many folders deep. This same folder structure will be re-created in the output, originals, and rejected folders as well.
Valid Folder Settings
The following requirements must be met in order to have a valid channel definition:
- Input folders for all channels must be unique. No two channels can watch the same input channel.
- The input folder cannot be a under any of the output folders
- The output folders cannot be under the input folder
- One channel can set its input folder to the ‘Originals’ folder for another channel. Doing this would allow you to process the same images with more than one preset.
‘Auto-setup all folders’ button
Click this, then choose one top-level folder for this channel, and it will create four sub-folders there automatically.
NOTE: if you use an absolute path for the output or rejected paths, for example “C:\Photos\Corrected_images” then this can cause a case where two input files with the same filename, but in separate folders, will over-write one another as they are corrected. This is a very rare use-case, so please use caution when using absolute paths.
NOTE on –path usage when creating new output files:
There is an important difference between including or excluding a trailing path separator (either \ or / depending on Windows or Mac). Including the trailing path separator (for example –path “c:\images\input\“) will instruct QuickServer to process all images within the input folder. Any folders inside that folder will be processed, and will be re-created in the output folder. So, if the Output Folder was set to “..\output” and the –path was --path "C:\images\input\\" and this folder contained a jobs folder as shown below, then the the resulting output files would be:
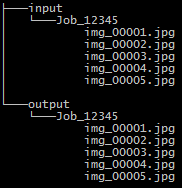
This identical output structure can be achieved also if the Output Folder is set to “..\..\output” and path is set to --path "C:\images\input\Job_12345" – but there is an important difference. In the first case, the entire contents of the input folder will be processed; in the second case, only the single Job_12345 is processed.
NOTE: on Windows from the CMD application window and in other uses, you may need to escape the trailing folder separator. Instead of just providing:
–path “C:\images\input\”
You might need to provide
–path “C:\images\input\\”
This is because Windows assumes the literal \” is an escape sequence for the double quote “
Please experiment with these various settings, and contact your EyeQ Account Executive if you have any questions.
‘Auto-setup all folders’ button (for ‘Create new corrected file’)
Click this, then choose one top-level folder for this channel, and it will create four sub-folders there automatically.
3. Tools


Enhancement
The Enhancement option in QuickServer allows you to apply Color Correction, Retouching, and Creative Filters to your photos. Learn more about Enhancements in QuickServer here.
Auto Crop
Auto Crop effortlessly handles the cropping process based on your specified parameters, ensuring consistent head sizes, eye lines, and gap between the top of the head and top of the photo.
Learn more about Auto Crop in QuickServer here.
Cloud Tools and API Key
QuickServer now integrates with the following Perfectly Clear Cloud tools:
- Background Removal – automatically removes the background from images, making it easy to create cutouts or transparent backgrounds without manual editing.
- Glasses Glare Removal – automatically eliminates unwanted glare from glasses in photos, enhancing clarity while preserving natural lighting and reflections.
Learn more about Cloud Tools in QuickServer here.
4. Input settings


Files to process
- Cloud tools work with JPG and PNG file formats only.
Other file formats will be processed with all other corrections but ignored by Cloud tools.
- Starting in Version 4.4, RAW file support is now provided separately on Mac and Windows machines.
On Windows, the following extensions to provide RAW support. Please click each link below and install these components to have the broadest access to RAW file support.
Monitoring (Hot Folder Channel)
The channel can be set to begin processing automatically, or it can require a start file or stop file.
Start file – once this file is detected in the input folder, then processing will begin. This allows you to copy all image files into the input folder, then trigger the processing to begin once a specific file is created. This is typically an empty text file – but it can be any file or filetype. Enter the complete filename and extension in this field, for example trigger.txt
Stop file – once this file is NOT found in the input folder, then processing will begin. This allows you to create a file in the input folder, then add images. To begin processing, delete the stop file. If a stop file is defined, then this take priority over a start file. This means that if BOTH a start and stop file are defined, and both exist in the input folder, then processing will NOT happen.
Typical workflows will use either a start file, or a stop file, but not both.
5. Output settings


Output format
Each channel can be set to convert images to JPEG, or to attempt to preserve the input format. For read-only formats like RAW files, these will always be converted to JPEG.
Color space
You can have the output images converted to sRGB, or you can have them remain in their original colorspace.
Output Quality
The JPEG compression level in QuickServer is configurable by the user. For reference, our JPEG compression level in QuickDesk is 93%.
Resize Output
The resizing feature allows you to decrease the dimensions of your images according to your specific requirements. It gives you flexibility in resizing your images while maintaining or altering the aspect ratio based on your preferences.
Original: The image will not be reduced. This is a default value.
Scale: You can enter a value from 1% to 100%.
Make sure that QuickServer will not output the image less than 32px. For example: if the original image was 40px*40px and after resizing became 10px*10px, the image will not be output.
You can set a specified dimension to long or short side, to height or width. Available values from 32px to 10 000px. Other side will be adjusted proportionally to maintain the aspect ratio.
6. Logs

Logs tab shows logs for current channel only + general QuickServer logs.
If you need the whole logs from all channels and QuickServer in one file you can find them in QuickServer Settings > Show Logs in Folder.
Logging level controls how informative logs should be.
QuickServer Settings

Enable all channels logging.
This settings control logging from all channels plus QuickServer itself into one single file. This settings doesn’t control logs settings for individual channels (it’s controlled in the channel settings > Logs).
Limit CPU Usage.
By default, QuickServer will use all available CPU’s to process images as quickly as possible – one image per CPU. But sometimes, QuickServer is installed on a machine that need to also perform other work. In these cases, you can set the CPU limit to a lower value – to ensure some CPU’s are not used by QuickServer and thus are available for other applications.
Cloud worker boost percentage.
When running channels that use Perfectly Clear Cloud tools – it can speed up the overall processing to process MORE images concurrently than what is set by the Limit CPU usage value. This setting controls how much more to allow. 50% is a good default and should work in most cases. If you use a very high or very low Limit CPU usage setting, then experimenting with different Cloud Boost Percentages to optimize overall processing time.
Main Window

Channel Status
Each Channel has a status, shown in the left column of the Channel list. The icon on the far left can be used to start or pause channels, and the checkbox for ‘Auto-start’ tells QuickServer to start this channel automatically, when QuickServer is first run. You can also click ‘Start All or Pause All’ at the top.
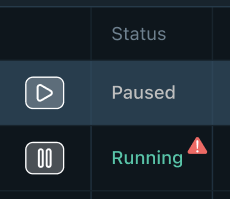
Here’s what the various Channel Statuses mean:
- Running – this channel is setup and enabled. Any images added to the associated input folders will be processed immediately
- Paused – this channel is setup, but disabled. No processing will occur to images in these input folders
- Waiting – this channel is setup, and enabled, but requires a Trigger File before processing starts, and a trigger file is not yet detected. As soon as a trigger file is created, or a stop file is deleted, processing will begin.
- Invalid – something is wrong and this channel cannot run. Perhaps the Preset defined for this channel does not exist, or the folders for the channel do not exist and could not be automatically created.
Controlling Channel Status
You may start all valid channels at once with the ‘Start all’ button at the top, and likewise can pause all channels with ‘Pause All’. Or you can click the play or pause icon at the left of any channel row to toggle the state of that one channel.
Opening Input/Output/Rejected Folders
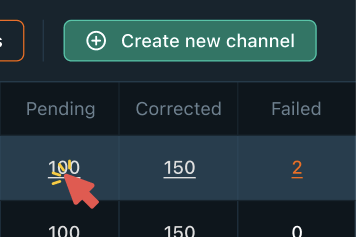
You can easily open input/output/rejected folder by clicking on file number in the corresponding line:
Understanding problems
Red warning icon next to the channel status tells about some errors in the logs. Clicking on it opens logs panel.
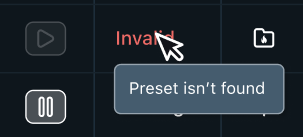
If the channel status turned to Invalid you can hover on it to see the reason