If a cloud correction fails on one image in your channel — such as Background Replacement, Glasses Glare Removal, or AI Image Upscaling...
Read moreUser Guide: Auto-Crop Editor (ALPHA v 0.4.0)
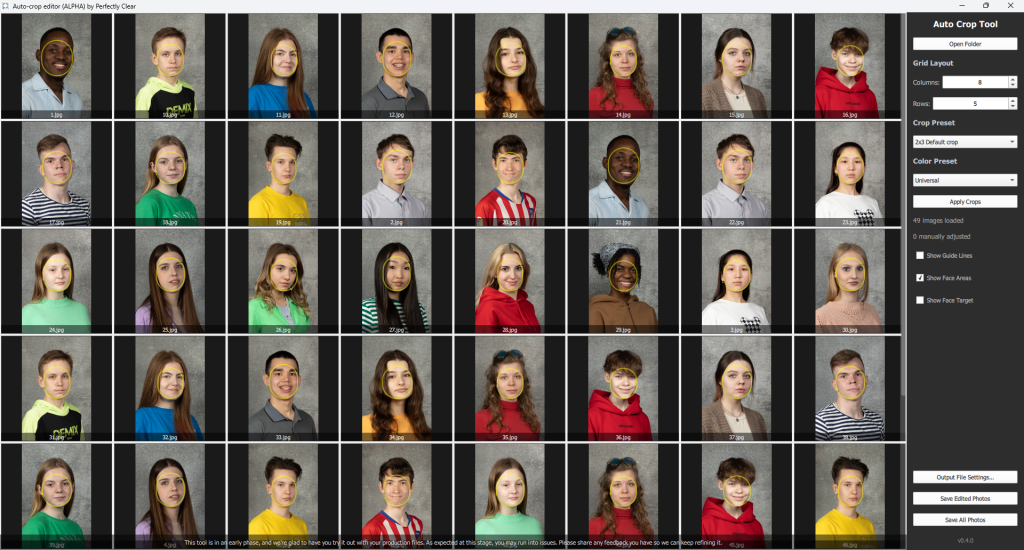
The Auto-Crop Editor automatically detects faces across a folder of portrait photos and applies consistent crops based on a preset. You can review every photo in a grid, fine-tune individual crops by hand, apply a color preset, and export the results.
Note: This tool is in an early (alpha) phase. You may run into issues, so please share feedback so we can keep refining it.
- Use cases
- Getting started
- Reviewing and adjusting crops
- Selecting color correction presets
- Adding more color correction presets
- Configuring output settings
- Saving photos & starting the next job
A. Use cases
The Auto-Crop Editor is flexible and can work into your workflow in a different ways.
- Fix set-aside photos. If you already run QuickServer (see Related Links), manually set aside the folders of photos that need review. Open those folders in the Auto-Crop Editor to fix just those crops, so you only touch the images that actually need it.
- Review all output. Alternatively, view the entire QuickServer output folder in the Auto-Crop Editor for a full quality check before delivery, viewing every photo rather than only the ones set aside.
- Use it at any stage, or as a standalone tool. The editor can be used at any point in your workflow to view crop results and adjust them. You can also do both the cropping and the color correction directly here, to compare the results from other products.
B. Getting started
Prerequisites:
- Obtain a CLI license key and Auto-Crop Editor download link from your Solutions Architect.
- Install ImageMagick. Saving cropped photos requires ImageMagick on both Windows and Mac. Install it before saving, or the saving step will fail.
- Mac (Homebrew) – Run the following in your terminal:
brew install imagemagick
- Windows – Use the official installer from imagemagick.org or run the following command in PowerShell:
winget install ImageMagick.ImageMagick
- Mac (Homebrew) – Run the following in your terminal:
- Download, install and run the Auto-Crop Editor.
Once the Auto-Crop Editor is running:
- Open your photos. Click Open Folder and select the folder containing your photos.
- Set the grid layout. Under Grid Layout, set Columns and Rows to control how many photos appear on screen at once.
- Choose a Crop Preset from the dropdown.
- Apply. Click Apply Crops and watch the crops applied to your photos.
C. Reviewing and adjusting crops
Guides and detection overlays
- Show Guide Lines: displays the top-of-head and bottom-of-head guidelines. Drag them to the level you want.
- Show Face Areas: displays the face areas detected by the tool.
- Show Face Target: displays the default face target.

4. Face Target Settings: opens controls to adjust the face target.

Manual adjustments
- Scroll the mouse wheel over a photo to adjust zoom.
- Drag a photo to reposition it.
- Zoom and position can be fine-tuned at any time.
- Manually adjusted photos show their filename in red font.
- The right panel shows a running count of manually adjusted photos in red font.

Rotating a photo
- Double-click a photo to open it in a pop-up.
- Left / Right arrow keys rotate by 1 degree (left = counterclockwise, right = clockwise).
- Hold Shift plus an arrow to rotate by 10 degrees.
- Drag on the slider to rotate the photo using your mouse. Then hold Ctrl plus an arrow to rotate by 0.1 degrees (mac users: Cmd instead of Ctrl).
- Reset returns rotation to zero.
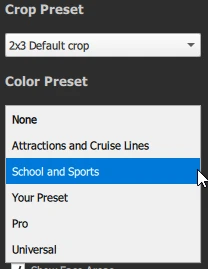
D. Selecting Color Presets
- Select a Color Preset from the dropdown. Any presets you already have in Workbench are automatically available.
E. Adding more Color Presets
- To add more presets go to Workbench and create a new preset (see Related Links).
- Select and export the desired AI Model or Individual presets from Workbench to the following location:
- Windows: App Data\Perfectly Clear\AutoCrop Tool\presets
- Mac: ~/Library/Application Support/Perfectly Clear/Auto Crop Tool/presets
- Quit and reopen the application to have the new preset available in the dropdown.
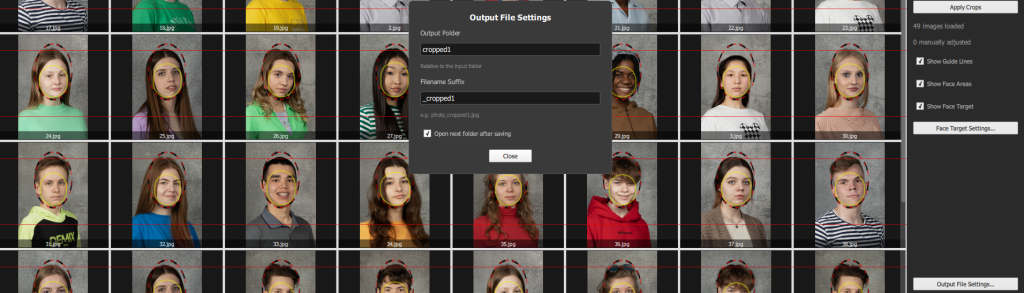
F. Configuring Output Settings
- Set a filename suffix for cropped files and choose the target output folder.
- Check Open next folder after saving to select the next folder once the photos are saved.
G. Saving Photos & Starting the next job
Important: ImageMagick must be installed on your device before this step (See Step B: Getting Started)
- Save Edited Photos: saves only the manually adjusted photos to the output folder.
- Save All Photos: saves all photos to the output folder.
- The selected color correction preset in Step D: Selecting Color Presets will be applied to the photos as they are being saved. The corrected and cropped photos are then saved to the specified output folder.
- Navigate back up to the top and click Open Folder to select a new folder. If you checked Open next folder after saving in Step F: Configuring Output Settings, the folder selector will pop-up automatically.
- Selecting a new folder will remove all the current images from the editor and display all the images from the selected folder.